Don Schindler

Executive Reputation Coach & Digital Marketer

Tag: setup

How to setup Instagram for yourself or your farm – Instagram 101

Instagram Don Schindler profile

Instagram Don Schindler profile

Instagram is a fun, visual social network (you have to have take a picture or video to post) to share your daily experiences, special moments and stories through photos and videos. It also hooks up directly to Facebook, Twitter, Tumblr and a lot of other sites so you can share across multiple platforms if you want.

If you need more convincing, check out these 6 reasons to use Instagram for your farm or business.

Get started now in just 7 easy steps. Here we go.

1. Download the Instagram app.

Instagram Sign Up screen

Instagram Sign Up screen

Instagram is a mobile platform so you’ll need to download the app from one of the following sites, depending on which device you’re working from:

2. Open the Instagram app once it’s installed.

Instagram Sign Up screen enter information

Instagram Sign Up screen enter information

At this point, you’ll have the option to register with Facebook or an email address. If you have a Facebook account already, registering through Facebook will be an easier option and allow you to quickly find which of your Facebook friends are also on Instagram.

If you choose to register using an email address, follow these next steps:

3. Create your profile.

Add your profile information

Add your profile information

To complete your Instagram profile you will need an email address, username, password and profile picture.

If you’re creating an account for your farm or business, choose a username that ties back to your farm or business (Ex. Windy Ridge Dairy). If it’s a personal account, I suggest using your name.

4. Add a profile picture.

Add profile picture to Instagram

Add profile picture to Instagram

Don’t forget to upload a picture before completing your profile. This image will set you apart from others and help your future followers quickly identify you. I recommend a headshot or a photo of your farm.

5. Add more information to help others find you on Instagram (optional).

Add more information so you can be found on Instagram

Add more information so you can be found on Instagram

This information is optional. I suggest entering your name to make it easier for others to search and find you on Instagram.

6. Find friends and followers.

Find your friends on Instagram

Find your friends on Instagram

Instagram now will help you find people to follow. If you click “Find Facebook friends to follow,” Instagram will search and find which of your Facebook friends have Instagram accounts and give you the option to follow them. You can also chose to “Find contacts to follow” and allow Instagram to access your phone contacts. The more people you follow, the more photos will appear in your feed.

If you choose to skip this step, you can always come back and find friends later or use the Instagram search to find specific people.

To search friends, click the “Explore” tab which looks similar to a navigation arrow. Enter the name at the top of the screen. Looking for some suggestions? Here are a few dairy farmers to follow: @dairycarrie, @tzweber, @ezweber1, @RayProck, @gilmerdairy, @trentbown.

Using search on Instagram

Using search on Instagram

7. Take a picture or video.

Take picture using Instagram

Take picture using Instagram

Let’s add your first picture. After you get the perfect shot, it’s time to choose a filter to change the look of your photo – Sierra, Black and White, Earlybird and more! Click “Next” to write a short caption for your photo.

From here, you can also easily share to Facebook, Twitter, Tumblr and more.

Now that you’re set up and have taken your first picture, it’s time to enjoy and remember to have fun with it!

Do you have any more questions about how to use Instagram? Post below or email me.

How do you set up a blog on wordpress.com or transfer your wordpress.com website to wordpress.org?

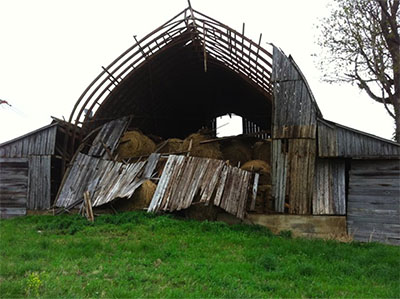
Our Big Barn Collapsed After A Wind Sheer

Our Big Barn Collapsed After A Wind Sheer

Normally, I do a step-by-step process with the How To’s but right now there are plenty of other blogs that walk you through the process of setting up or moving your wordpress blog.

I’ve moved several blogs from different hosts and I can tell that it gets easier and easier but that doesn’t mean it’s so easy that I would let my dog take a whack at it.

Remember your blog is your home (or barn) on the internet and it’s no fun to rebuild that home (or barn) when you accidentally knock it down yourself.

So here’s what I would do if I were doing and I didn’t have the knowledge of blowing up my past blogs.

I would probably pay for it.

That’s hard for me to say. I’m a cheap guy (you can ask my wife). I like to figure things out on my own and then take a crack at it.

Am I successful? It really depends on if I think I can give up without someone knowing.

So if you are in the process of setting up a blog, I would recommend the free services of WPbeginner. I haven’t used them yet and I’m not an affiliate but everything else they say on the website is legit so why would they lie about free setup.

All you have to do is buy the host and the domain (you can get both from wordpress) and just have them set it up.

They also have a couple of posts on the do it yourself process.

Michael Hyatt (I’m a big fan of his podcasts “This is your life”) also has a video on the overall wordpress set up that’s supposed to take only 20 minutes.  I’ve never set up a new site that fast but, like I said, things are getting easier.

Now when it comes to moving your wordpress.com to a wordpress.org website, you may think that I’m going to say “hey, you can do this.”  You know, because you’ve been blogging for a while and you know how wordpress works.

But again if I didn’t have my experience, I think you’ll be better off letting the experts handle it. For $129.00 per blog with a system they called “Guided Transfer“, I think that’s a steal. I’ve spoken to developers about these kind of things and most of them charge that for an hour’s worth of work.  They will not be able to move your blog in less than an hour.

I would rather you let the experts handle the move and you concentrate on what you are good at doing. Working the farm and telling the world your story – that’s so much better then fighting to get your website back up and running.

What do you think? Are you going to tackle this project by yourself or let someone else do it?


13 Steps To Getting Started with a Blog

Keep Calm and Blog On T-shirt via spreadshiet

Keep Calm and Blog On T-shirt via spreadshirt

Blogging 101 – Getting Started is a training module I’m teaching to communicators and dairy farmers. It’s all about getting started with a blog as your mainstay on the internet. I’ve given the reasons of why you should blog but here are 13 steps to help you on your journey. And as always, you can reach out directly if you need help. Just hit up here or here and I’ll try to get you an answer or find you someone who can help.

1. Personal/professional brand
You need to figure who you want to be in your professional and personal life. I don’t think these things are separated in this digital age we live in and if you are going to have a digital life and brand then the two need to live together. Mainly because it’s really hard to separate the two and secondly, if you are only going to be a professional and remove the personal, no one is going to find you interesting.

We are humans and humans are social and personal – not robots. You can focus on your profession for your blog but if you never tie in personal stories, it’s just not going to resonate with the audience. Do you need help figuring out how to write out a personal brand statement? – check my post on it. It’s super simple yet will help you in profound ways.

2. Write, write, write.
Write out your first three or four blog posts in whatever system you prefer.  Definitely DON’T write a post in the system – directly on the internet. It only takes a few lost posts before you will switch to just writing in evernote (which I love) or in notepad or text-edit.

3. Add Visuals.
Find pictures / video content to associate with your blog and add them to it. Don’t steal or just grab stuff off the internet. You need to give credit where credit is due. I usually look through free image galleries or get images from Flickr.com/creativecommons – you have to give attribution and don’t photoshop their stuff unless they tell you it’s ok.

4. Select Your Domain.
Think long and hard about your domain name (keywords in the URL are important).
Having a your own domain name (with personal blogs, I suggest using your name) with good keywords in the URL. If you are writing about professional stuff, then make sure your professional terms are in the name.  You can use godaddy.com or other providers to get your name.

5. Select Your Technology – for the future.
If you get a very simple system, you may grow out of it. Pick something you think will be best for you in the future. If you are not tech savvy at all – try tumblr.com.

If you are a little more tech savvy and want more control – bloggerwixsquarespace or wordpress.com.

Want a lot of control – wordpress.org but be prepared to do a lot of work (you might need to learn how to code a few things like w3schools.com) or pay programmers to help you.

6. WHAT’S YOUR CALL TO ACTION!
What do you want the audience to do? Yes, read your post is why they are here – what’s their next step? Get their email address? Connect to you via social media? Sign a petition? Spread the word?

7. Are you a designer?
This is definitely not something to DIY. Hire a professional to make you look good. It’ll be worth it in the end.

8. Add your posts.
Use notepad or textedit to remove code. Learn about categories and tags. Take your time, work out the bugs, you can have a deadline but don’t force it out.

9. Add your other content.
You need an About page and your CALL TO ACTION page. Set those up. Add your social media profile links. Add your fun widgets. Don’t distract people too much. Everything has a purpose.

10. Get on a schedule.
Make and schedule your editorial calendar. One post a week is hard to do but will probably get you the most bang for the buck. Stay consistent. I need to follow my own advice here.

11. Link it up!
Don’t forget to link your blog to all of your social media profiles and email profile. This will help drive traffic.

12. Analytics helps you adjusted.
What should you post next? What are people actually reading? Why am I still blogging? Get Google Analytics (free) set up on your website to insure you understand what your traffic is doing and what they like about your website.

13. Use your network to drive traffic.
After posts, make sure you are posting your links to all your social media contacts.

BONUS: TIPS and TRICKS to get traffic to your blog

  • Help others
  • Talk about others
  • Link to others
  • Did I mention others and link to them?
  • Read other blogs and comment on them.
  • Use Google’s Autocomplete to work headlines

So are you ready to get blogging?  What are your steps to set up?  Anything I missed that you think I should add?

© 2023 Don Schindler

Theme by Anders NorenUp ↑